写在前面
这是PB案例学习笔记系列文章的第31篇,该系列文章适合具有一定PB基础的读者。
通过一个个由浅入深的编程实战案例学习,提高编程技巧,以保证小伙伴们能应付公司的各种开发需求。
文章中设计到的源码,小凡都上传到了gitee代码仓库https://gitee.com/xiezhr/pb-project-example.git
需要源代码的小伙伴们可以自行下载查看,后续文章涉及到的案例代码也都会提交到这个仓库【**pb-project-example**】
如果对小伙伴有所帮助,希望能给一个小星星⭐支持一下小凡。
一、小目标
本案例我们将制作一个根据用户选择动态设置菜单的程序。用户通过选择“恢复”、“无效”、“去除” 来改变对应菜单项。
最终实现效果如下所示
二、创作思路
我们通过单选按钮、复选框来选择,再通过相应的设置菜单项的Enable和Visible两种属性来动态设置菜单栏
① 单选框
当单选按钮处于选中状态时,单选按钮中出现一个黑色圆点,未选中时,小圆圈中没有其它图案。
当我们使用组框控件对单选按钮分组时,同一组中的单选按钮只有一个会处于选中状态,其它全部处于非选中状态
② 复选框
当复选框被选中时,复选框上显示选中符号(打勾符号)
当未选中复选框时,复选框上不显示选中符号
三、创建程序基本框架
① 新建examplework工作区
② 新建exampleapp应用
③ 新建w_main窗口,将其Title属性设置为“设置菜单”
由于文章篇幅原因,上述步骤不再赘述,如果忘记了的小伙伴可以翻一翻之前的文章复习一下
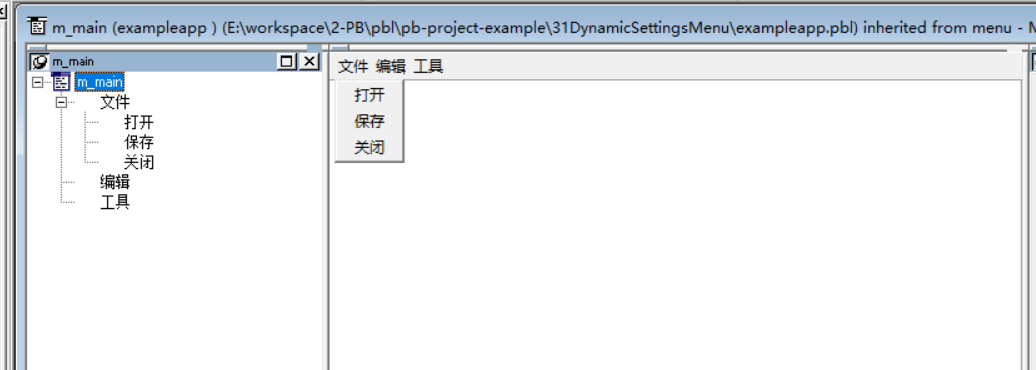
④ 新建m_main菜单对象,如下图所示
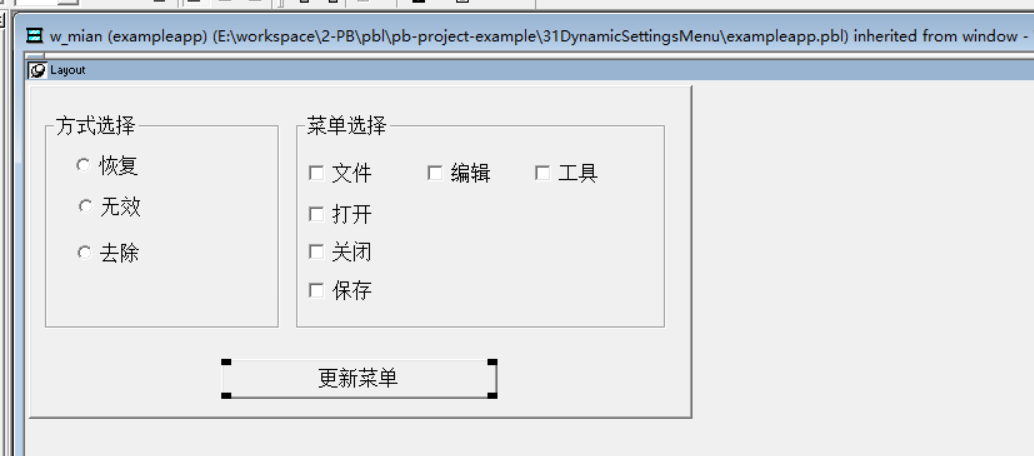
⑤ 控件布局
向w_main窗口上添加2个GroupBox控件、3个RadioButton控件、6个CheckBox控件和1个CommonButton控件。
调整各个控件的大小与位置,如下图所示
四、编写事件代码
① 在cbx_file控件(文件)的Clicked事件中添加如下代码
If not this.checked then
    cbx_open.checked = false
    cbx_close.checked = false
    cbx_save.checked = false
end if
② 在cb_1按钮(更新菜单)的clicked事件中添加如下代码
if rb_1.checked then
    m_main.m_file.Enabled = True
    m_main.m_file.Visible = True
    m_main.m_file.m_open.Enabled = True
    m_main.m_file.m_open.Visible = True
    m_main.m_file.m_close.Enabled = True
    m_main.m_file.m_close.Visible = True
    m_main.m_file.m_save.Enabled = True
    m_main.m_file.m_save.Visible = True
    m_main.m_edit.Enabled = True
    m_main.m_edit.Visible = True
    m_main.m_tool.Enabled = True
    m_main.m_tool.Visible = True
end if

if rb_2.checked then
    m_main.m_file.Visible = True
    m_main.m_edit.Visible = True
    m_main.m_tool.Visible = True
    if cbx_file.checked then
        m_main.m_file.enabled = false
        m_main.m_file.m_open.Visible = True
        m_main.m_file.m_close.Visible = True
        m_main.m_file.m_save.Visible = True
        if cbx_open.checked then
            m_main.m_file.m_open.Enabled = false
        else
            m_main.m_file.m_open.Enabled = true
        end if
        if cbx_close.checked then
            m_main.m_file.m_close.Enabled = False
        else
            m_main.m_file.m_close.Enabled = True
        end if
        if cbx_save.checked then
            m_main.m_file.m_save.Enabled = False
        else
            m_main.m_file.m_save.Enabled = true
        end if
    else
        m_main.m_file.Enabled = true
    end if
    if cbx_edit.checked then
        m_main.m_edit.Enabled = false
    else
        m_main.m_edit.Enabled = true
    end if
    if cbx_tool.checked then
        m_main.m_tool.Enabled = false
    else
        m_main.m_tool.Enabled = true
    end if
end if

if rb_3.checked then
    m_main.m_file.Enabled = True
    m_main.m_edit.Enabled = True
    m_main.m_tool.Enabled = True
    if cbx_file.checked then
        m_main.m_file.Visible = false
        m_main.m_file.m_open.Enabled = false
        m_main.m_file.m_close.Enabled = false
        m_main.m_file.m_save.Enabled = false
        if cbx_open.checked then
            m_main.m_file.m_open.Visible = false
        else
            m_main.m_file.m_open.Visible = true
        end if
        if cbx_close.checked then
            m_main.m_file.m_close.Visible = False
        else
            m_main.m_file.m_close.Visible = True
        end if
        if cbx_save.checked then
            m_main.m_file.m_save.Visible = False
        else
            m_main.m_file.m_save.Visible = true
        end if
    else
        m_main.m_file.Visible = true
    end if
    if cbx_edit.checked then
        m_main.m_edit.Visible = False
    else
        m_main.m_edit.Visible = True
    end if
    if cbx_tool.checked then
        m_main.m_tool.Visible = False
    else
        m_main.m_tool.Visible = true
    end if
end if
③ 在开发界面左边的SystemTree窗口中,双击exampleapp应用对象,在其Open事件中输入如下代码
open(w_main)
五、运行程序
经过一波代码编写后,来看看我们的劳动成果是否达到预期
本期内容就到这儿★,°:.☆( ̄▽ ̄)/$:.°★ 。 希望对您有所帮助
我们下期再见 ヾ(•ω•`)o (●’◡’●)